


Not everyone wants to use a rifle scope, but there are really few who don’t. Being able to see the target well, especially if you have poorer eyesight, is a tremendous boon to a shooter. While picking out the perfect scope is a subject for another blog, there are some things that need to be said about scope mounting. Follow along with me as I address a few things you need to keep in mind when you go to mount a scope on your air rifle or pellet rifle.
First Steps to Mounting a Rifle Scope
The first thing you want to do is determine the correct size, height, and mount style needed for your application. Basically, these three factors will determine if the scope can be used with your rifle or not. Common scope tube diameters are one inch and 30mm. Yes, there are 34 and 35mm scope tubes, but those optics are not common, especially in the air gun community. If the scope has an objective bell of 30mm to 40mm, most low or medium height rings will work just fine to mount the scope to the rifle. If you choose a larger scope objective, typically 44mm to 50mm in diameter, you will want either high or extra high rings to ensure there is no interference of the scope’s objective bell with the barrel or receiver of the rifle.
The third crucial factor you want to make sure to get right is choosing the right attachment method for your rifle. Some air rifles use the narrower 11mm or 3/8th inch dovetail rail. This is a very common scope mounting method, especially on older rifles. Still, other air rifles use the locking lugs of a Weaver or Picatinny rail. Both the Weaver and Picatinny rails are approximately 5/8ths of an inch wide. A general rule for determining which type, either Weaver or Picatinny, of rail to buy is that Weaver mounts will work on both Weaver and Picatinny Rail. Picatinny mounts, however, will not work on Weaver scope rails.
What to do Next to Easily Mount a Scope
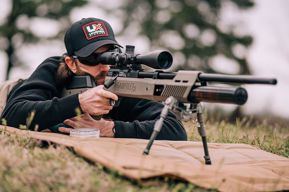
Once you have the right set of rings or one-piece mount in your paws, the next step is getting it all put together. While you can set the rifle scope into the rings or mount before you put it on the rifle, it’s a lot easier if you don’t. In an ideal world, you will have a gun vise or shooting rest that will allow the rifle to be aligned perfectly plumb with the ground. If you don’t have something like this, you can substitute a couple of rolled-up blankets or towels to make an improvised rest for your kitchen or shop table. Just make sure that it will be difficult for the rifle to roll off onto the floor!
With the rifle plumb, you can begin setting the bases into the rail. Weaver and Picatinny bases, by their nature, have locking lugs to prevent the rings from slipping either back or forward. This doesn’t mean they won’t move, it just means that they won’t move much. Dovetail bases, on the other hand, sometimes have a reversible locking pin that will sit inside of a corresponding hole on the scope base. Some rifles equipped with an 11mm dovetail base will not have this hole present. These guns typically have a metal tab located at the back of the rail grooves. In this case, the rearmost ring must be set against this tab to prevent the ring from traveling backward while in use.
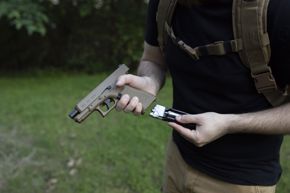
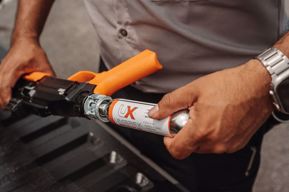
The RWS Lockdown Mount (pictured) has two locking pins and corresponding locking pin holes in the scope mount. Other air rifle scope rings often include this pin feature.
Typically the scope rings can be placed in relation to the locking pin holes on a dovetail rail, or wherever you find comfortable on a Weaver/Picatinny style rail. I like to test fit the bases in those preferred spots and then set the scope in the finger tight bases to gauge eye relief. Some rifle scopes have a generous eye relief for shooting that will push the scope forward and away from your eye. Some have a more shallow relief that will require the scope to be mounted further back in the ring. It is best to know where things need to be set before you begin tightening the screws in earnest. And don’t forget to make sure that your scope doesn’t interfere with your rifle’s chamber or mag well.
Mount Your Scope Slowly
Once you begin turning screws it is important to remember how big the screws are in relation to the force you are applying. Yes, they do need to be tight, but not ugga-dugga tight. When you get into ugga-dugga territory, you will end up with a broken screw or stripped crew head. In either case, you will likely need to buy a new set of rings unless you can extract a broken screw that is about 2.5 mm in diameter from the scope base.
Once again, in an ideal world you’ll have an inch-pound torque driver that can be set to the appropriate figure, usually around 20-25 in-lbs for ring bases, and you are golden. If you are like me and don't have a torque driver, just tighten the base screws with a couple of fingers on the Allen key. Get the screw tight with your index and middle finger no more than halfway down the long end of the key and that will be pretty close. Keep in mind your track record with hand strength (do you crush people’s hands in a handshake? Can you hide a full 12-ounce soda can in your fist? etc.) and tighten accordingly.
Once the bases are on and snugged into place, set the scope in the bases again so you can begin installation of the caps. Don’t worry about perfect alignment of the reticle at this stage. You will bump and move the scope while you are getting the caps started, so any effort in keeping it lined up will be wasted.
How To Tighten Scope Mount Screws
Installing the mounting ring caps is very easy to mess up. Whether you have 2, 4, or 6 screws in the cap, you must proceed with caution so that even pressure is placed across the surface of the scope tube. A mistake here can lead to a crushed scope tube. And I repeat, a mistake here can lead to a crushed scope tube.
If using a simple 2 screw cap, just start each of the screws and run them down with your fingers. Once the head of the screws is getting close to the top of the cap, slow down and make sure the cap has an even amount of clearance on each side of the ring set. If one side has a larger gap than the other, back off the narrow side and tighten the larger side until the gap is even on both sides.
If using a 4 screw cap, work the screws down in a criss-cross pattern. Until you get them all run down, but not tight. With 6 screw caps, I like to install the middle set of screws and treat it like a 2 screw cap to set the initial gap. With the initial gap set, carefully run down the other screws so they are all the same depth.
Once you are certain that the gap is even, just snug the screws on both sides a little. This will create a touch of friction between the scope and the rings, but still allow the scope to turn so you can get it in perfect alignment. If you can get behind the rifle and look through the scope while it is set in the mount, you can nail the alignment easily enough. If not, you will need to pick up the rifle and shoulder it to set the alignment. There are some other techniques using a plumb bob or other known vertical line to align the reticle as well. A simple search will reveal those.
If you are happy with the way things look through the reticle, start your final tightening sequence. This can be a tedious process, especially with the 4 and 6 screw caps, but it must be this way. You have to keep the pressure even as the screws are turned so that the cap doesn’t distort and put pressure on just one part of the scope tube. Take your time and make 1/8th and 1/16th turns as needed until you achieve the 15-20 in-lbs required for most cap screws. Once again, use an abundance of caution when snugging these screws down.
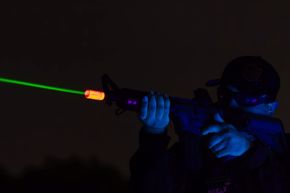
Once everything is snugged down to the proper torque setting, you are ready to get things zeroed in. This can be done the old-fashioned way by walking it in or you can use the Absolute Zero laser device as a way to take care of the adjustment really quick and easily with a minimum of shooting. But that is the subject for another blog.
Mark Davis, avid outdoorsman, family man, and outdoors writer, is the social media specialist for Umarex USA.