


This article is specific to the RWS 48, 52, and 54.
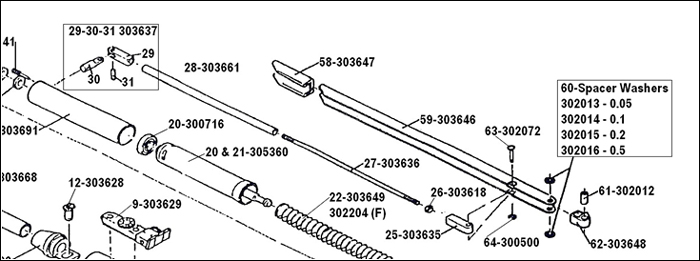
RWS Diagram
The pull rod (27) on a side cocking air rifle is designed to be the weaker link in the cocking system. This is by design as the pull rod is easier to replace than other cocking components and is also less expensive. The pull rod should never break if the gun is operated as designed. However, if a person unfamiliar with the proper function does cock the rifle and then fails to depress the release button on the top left of gun when attempting to close the cocking handle, then the pull rod will be either bent or broken.
Here is how you change pull rod:
- Remove the e-clip (64) from the bottom of the pull rod pin (63) and then remove pull rod pin.
- Unscrew the pull rod (27) from the front hinge assembly (29-31).
- Remove the plastic sleeve (28) from the broken pull rod. If you try to pull it off, it sometimes tightens down and stubbornly resists being removed. The trick is to clamp the stub of the pull rod in a vise. Then, using pliers get between the plastic sleeve and the vise jaws and PUSH the sleeve off of the rod.
- Thread the new pull rod (27) fully into the front hinge assembly (29-31) until it bottoms out.
- Slide the plastic sleeve (28) over the new pull rod.
- Thread on the jam nut (26) and run it up to the end of the plastic sleeve.
- Thread on the rear hinge block (25).
- Place the rifle on a padded surface in a normal horizontal position.
- Position the Cocking Arm (59) so that the grip (58) end of Cocking Arm is in a partially opened position about 3” out from the stock of the rifle.
- Screw the rear hinge block (25) on or off of the pull rod until the holes of hinge block line up with the pin holes on the cocking arm (59).
- Drop the pin (63) in place. Now the pull rod assembly is just a little over-long. As you push the cocking arm closed it should snap lightly into place alongside of the stock. The rear hinge block (25) is the adjustment point to either increase or decrease the tension on closing the cocking arm. You can adjust the tension by making ½ turn adjustments on the hinge block.
- Replace the e-clip (64) and tighten the jam nut (26) up against the hinge block (25).